MoneyWorks Manual
Roles
Roles are used to help manage your contacts and your communications with them. They are essentially labels that you can optionally assign to a contact. Thus you might assign a role of “Payables” to a person at each of your suppliers—when you make payment, you would send the email remittance advice to people with the “Payables” role.
You can define up to 16 roles (in Edit>Document Preferences, see below), and more than one contact within the same organisation can have the same role. Similarly a contact might have more than one role (for example, they might have roles of both “Payables” and “Receivables”.
Defining Roles
Roles are defined in the Document Preferences
- Choose Edit>Document Preferences to open the Document Preferences window
- Click on the Fields panel
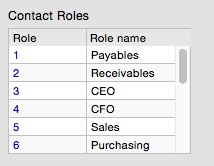
The Contact Roles can be seen at the bottom right of the window
- Click on one of the 16 roles
- Type the name (up to 15 characters) into the Role name field.
Note that, changing the name of a role does not affect the contacts who have been assigned that role (their role is merely relabelled as well).
Assigning roles to a contact
Roles are assigned (and unassigned) to contacts using the Role pop-up menu. In the example below, Freda has both the CEO and the CFO role.

To assign a role, select it from the Role pop-up menu. The role will be added to the existing roles (if any) for that contact, and will be ticked in the pop-up menu.
To remove a role (one that is ticked in the Role pop-up menu), reselect it from the menu.
Note that the changes only come into effect when the Name itself is saved.
A Note on importing contacts
For compatibility reasons, the original contact1 and contact2 details are stored as before in the name table (these appear at the top of the contacts list, and are labelled 1 and 2). You can use the name.contact fields to import into these.
Any additional contacts are stored in the Contacts table in MoneyWorks, and will need to be imported into that table (you will need the code of the customer/supplier to be part of the import).
Roles are imported by specifying their role “index” — this maps onto the role names as specified in the Preferences. Because there are 16 roles, and a contact can conceivably have several roles, membership of a role is identified as a bit setting in a 16-bit Role field. Thus #011 is role 1, #02 is role 2, #04 is role 3, #08 is role 4, and #0D is roles 1, 3 and 4).
Importing updates to existing roles: To update an existing role for a contact, you must uniquely identify the contact record. Use the contact.sequencenumber for this. Note that contact1 and contact2 can be updated using the name.contact fields.
1 A constant preceded by a # represents a value in hexadecimal (base 16). That #0F, #10, #11 represent decimal 15, 16 and 17 respectively. ↩