MoneyWorks Manual
Printing Cheques
Use the following procedure to print cheques on pre-printed cheque stationery.
- Choose the cheque form from the Use Form menu and click Print
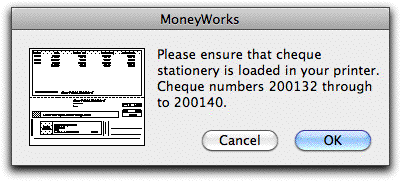
You will be alerted to put the cheque stationery in the printer.

- Load the stationery and click OK
The Print dialog box for your printer will appear.
Clicking Cancel will return you to the Cheque Preview window.
- Click OK to initiate printing.
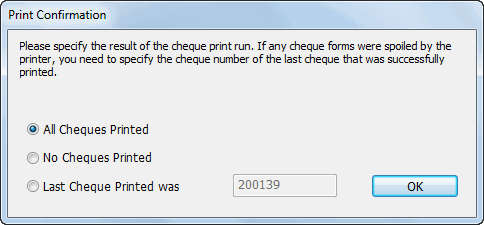
After the cheques have been printed, a confirmation dialog box will appear. You need to physically check that the cheques have been printed. If there has been a paper jam or similar error, you may need to either (a) try printing again or (b) redo the whole cheque run (if the cheque forms were spoiled, thus necessitating reallocation of cheque numbers).

If there was a problem with printing, you can specify the last cheque that printed successfully by clicking Last Cheque Printed and entering the number of the last cheque that successfully printed. The spoiled cheques will be removed from the preview list, still enabling you to complete all the payments that were successfully printed. This allows you to redo the cheque run for the spoiled cheques, allocating new cheque numbers.
If printing failed but no cheque forms were spoiled, click No Cheques Printed then click OK. This will allow you to try printing the cheques again.
If all the cheques were printed successfully, just click OK with the default setting of All Cheques Printed.
- After the cheques have been physically printed, choose the appropriate option in the Print Confirmation window and click OK
Cheque Page Settings: Page Settings for custom Cheque/Remittance Forms are normally done when you create the form in the Forms Designer. If you need to change the page setup or margins (for example, you are printing the form on a different printer) click the Layout button in the Print Form window to open the Form Setup window, in which the page size and margins can be altered — see Setting the Form Size.
- Click Finish/Next after printing any of the forms that you require
This button is labelled Next if you opted to create an electronic payments file by setting the Do Electronic Payments Export Step option. Clicking it will display the Electronic Payments window.
Note: Clicking the Finish/Next button will create and post the actual Payment transactions. This is the point of no return.
If the payments run is cancelled, the transaction records for these payments are not created or posted, and you can repeat the Process Payments command for the same marked invoices later.