MoneyWorks Manual
Paying a number of creditors
To pay a number of creditors at one time, use the Batch Creditors Payments command. This allows you first to decide which invoices to pay (and how much to pay), and will then produce a payment for each creditor being paid. During the process you can print out cheques and remittance advices if required or create a file of direct payments to submit to your on-line banking software.
To pay a batch of creditors:
- Choose Command>Batch Creditor Payments or press Ctrl-Y/⌘-Y
The Pay Creditors window will be displayed.
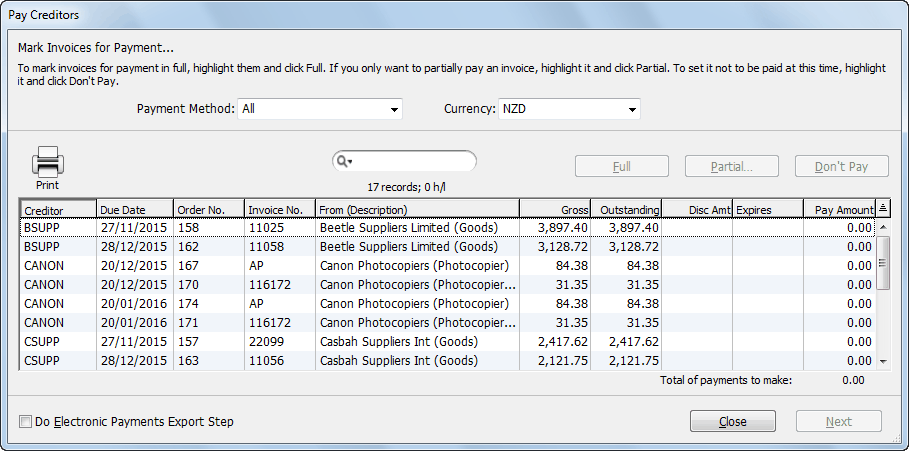
This displays only unpaid or partially paid purchase invoices.
Payment Method: In practice you may pay some creditors by cheque, some by direct credit and others by alternate methods. The payment method for a creditor is set up in its name record.
- Set the Payment Method to the type of payment being processed
For example, set it to Electronic to show just those payments due to creditors who are to be paid by direct credit.
Setting it to All will display all outstanding purchase invoices.
Note: Invoices on hold will not appear in the list.
- If you are dealing with more than one currency, set the Currency pop-up menu
You will only be able to pay invoices in the designated currency.
- Highlight the invoice that you want to pay by clicking on it
You can highlight more than one invoice by holding down the shift or Ctrl/⌘ keys. You can also sort the columns, use the Find command etc.
To Pay an Invoice in Full
- Click Full to mark that the highlighted invoices are to be paid in full
The Pay Amount column will contain the amount necessary to fully pay the invoice, adjusted for any prompt payment discount that is available.
To Part Pay an Invoice
- Click Partial to mark the highlighted invoices to be part paid
The Partial Payment dialog box will open.
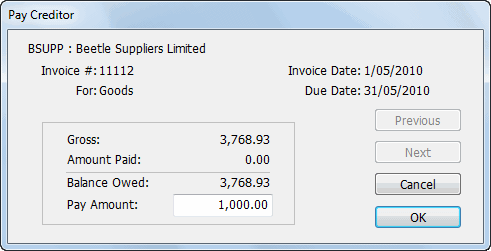
- Key in the amount you wish to pay
This must be no greater than the balance owed.
- Click Next to move onto the next highlighted invoice, or OK to return to the payables list.
To Reset the Payment Amount
- Click Don’t Pay to reset the highlighted invoices
The Pay Amount will be set to zero.
Printing a List of Payables
You can print the list of payables and allocated amounts, useful if you need to get authorisation before paying invoices. To print the Pay Creditors list:
- Choose File>Print, or click the Print List toolbar icon, or press Ctrl-P/⌘-P
To Save the Allocated Amounts
You may need to stop processing invoices for payment at this point and return to it later. To do this:
- Click the Close button
The Pay Creditors window will close—any allocations made are remembered, and will appear next time you do a Batch Creditor Payments.
To prepare an electronic banking schedule
To make an electronic banking schedule (i.e. a file that can be loaded into your bank’s on-line banking service):
- Set the Payment Method pop-up to Electronic
Only the creditors marked for Electronic payment will be listed. For this to work, you must have stored each creditor’s bank account details — see Electronic banking details for when we pay them. This is available for supported banks only.
Note that you can force any batch to be electronic by turning on the Do Electronic Payments Export Step option.
To Prepare the Payments
Once you have identified the invoices to be paid, you need to generate the actual payment transactions:
- Click Next
The Creditor Payment Run window will be displayed
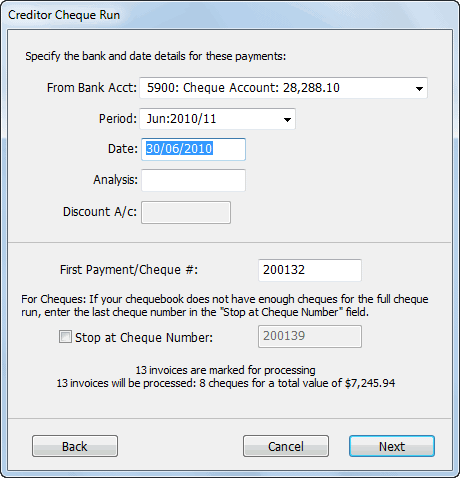
Use this window to specify the details of the payments/cheques to be drawn. The number of payments and the total amount is displayed in the lower half of the window. MoneyWorks prepares one payment for each creditor—this may represent payment for several invoices.
- Choose the bank account from which you wish to make payment
- Set the Date, Period and Analysis if necessary
If you are receiving a prompt payment discount
- Enter the general ledger account that the prompt payment amount will be coded to
MoneyWorks will create a credit note (coded to this account) for the discount and apply it to the payment amount, reducing the actual payment. The general ledger code will normally be an expense account.
If you are paying by direct credit using online banking
If you are paying these creditors by direct credit, you will prepare the payments as if you were paying them by cheque, but instead of printing cheques you can have MoneyWorks create a file which can be read by your bank’s special on-line banking software1.
MoneyWorks will still ask for a reference number for each transaction (analogous to the cheque number). However in this case the reference number is not one preprinted on a cheque—instead it is for your own use only (and, depending on the bank, may not even appear on your creditor’s payment advice).
- Enter a reference number into the First Payment/Cheque # field
This is the reference number for the first payment, and will increment for each additional payment. The reference numbers can be alphanumeric.
- Click the Next button
The Print window will be displayed.
- Proceed as per Printing Cheques and Payment Schedules below
If you are not paying by on-line banking software
If you are paying by cheque, you need to specify the numbers of the cheques that will be used. These need to correspond exactly to the numbers pre-printed on your cheque stationery.
- Enter a new First Payment/Cheque number if it is different from the one displayed in the edit box
MoneyWorks remembers the last number allocated to the previous batch of creditor payments. This batch of payments may not follow consecutively particularly if you are using a manual system for writing cheques.
The final cheque number is automatically entered for you based on the number of cheques that MoneyWorks needs to write to pay all the marked invoices.
- If you do not have sufficient cheques in your current cheque book or stationery, turn the Stop at Cheque Number option on and enter the last cheque number that you have available
MoneyWorks recalculates the number of cheques to be produced and therefore the number of invoices to be paid. The unpaid invoices from this run can be processed in a subsequent run.
- Click the Next button
The Print Payments Schedule window will be displayed
Printing Cheques and Payment Schedules
The Print Payments Schedule window shows the payment details.
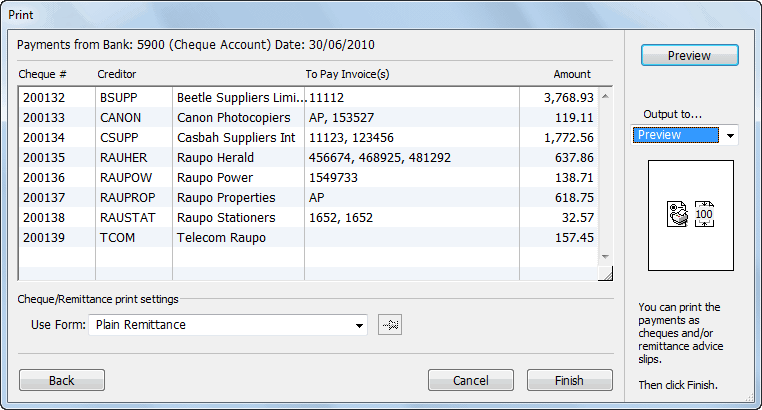
Notice that the creditors are processed in alphabetical order of creditor code. You can drag the payment records up and down in the list to reorder them (this also changes the cheque number assigned to that payment).
At this stage you should take the time to check that everything is correct. If there are any mistakes—there is an invoice being paid that you didn’t mean to mark for payment, for example—you can click the Back button to return to the previous screen (or Cancel to start over).

- Select the type of printout (if any) you wish to produce from the Use Form pop-up menu, and click Print
The printouts that you can produce are:
Plain Remittance—Remittance Advice slips are printed one-per page for each payment, and list the invoices being paid. Use this if you are paying by direct credit and want to email payment advice to each creditor.
Summary—Prints a list of the cheques including payee and amount for use as a record or for writing cheques manually.
Customised Remittances—For printing a remittance advice with no associated cheque. You can modify or create these forms to meet your own requirements.
Customised Cheques—For printing a cheque (which may have an attached remittance) on pre-printed cheque stationery. You can modify these forms to meet your own cheque requirements, or create your own design from scratch.
If you are printing cheques, see below.
If you are creating a payments file for submission to an online banking system — see Electronic Payments. Note that in this case you may also want to print/email remittances, but you will definitely not want to also print cheques.
To email remittance advices
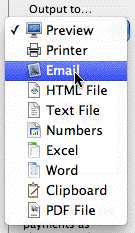
If you are paying by direct credit and want to email a remittance advice (instead of printing and mailing it):
- Choose the remittance advice in the Use Form pop-up, set the email option and click Send
The Mail Attachment window will be displayed.
- Proceed as described in Emailing Forms
1 MoneyWorks cannot support every bank format. However in MoneyWorks Gold it is possible to write a custom report and use that instead (you will need to get the format specifications from your bank). Further, if you call the report “x.Bank.bankname.crep”, and place it in your Custom Scripts folder, it will appear as a bank Format option in the Electronic Payments command. Here “x” is the country Locale (normally the first character of your serial number), and bankname is the name of the bank; e.g. “C.Bank.TD Bank.crep” for the TD bank in Canada). ↩