The Datacentre REST service has had SSL (https) support since version 6.1. This is enabled in the DC Console by adding a certificate/key pem block for the REST service.
In Datacentre 7.1, the MoneyWorks native networking protocol gains SSL support. This can be enabled in a similar fashion (supplying a certificate/key). If SSL is enabled, all clients must connect using SSL. When connecting via Bonjour, a 7.1 client will know to use SSL. When connecting via a manual connection, the user must specify SSL using the SSL check box. MoneyWorks Now™ hosts always use SSL, using a certificate from the MoneyWorks Now Signing Authority.
Note: Clients must be updated to 7.1.x before enabling SSL. 7.0.x clients will not be able to obtain the update from the Datacentre when SSL is enabled (because they have no SSL support). They can, if necessary, update via the Software Update facility.
You can specify a secure connection in the moneyworks URL scheme by prefixing the server by "ssl/"
moneyworks://server:port?doc=Docname –non-encrypted connection

moneyworks://ssl/server:port?doc=Docname —secure connection
There is also a MoneyWorks Now variant
moneyworks://now/emailaddr/document_or_company_name
The emailaddr is the MWNow login name. This part may also include a colon followed by the password, but usually the password should be stored in the Keychain/Vault.
Obtaining an SSL certificate
Generate a private key for your server, and a Certificate Signing Request.
If you're on a Mac, here are the commands that you can enter into Terminal to generate these using openssl.
Create a directory for the files
mkdir MyCertFiles
cd MyCertFiles
Generate the private key and csr. You will need to fill out the details for your certificate, the most important one being Common Name. This will be the Fully Qualified Domain Name for your server (e.g. yourserver.yourcompany.com). If you just hit return, the default value in [ ] will be used.
openssl genrsa -out private_key.pem 2048
openssl req -out mydomain.csr -key private_key.pem -new

Country Name (2 letter code) [AU]:US
State or Province Name (full name) [Some-State]:California
Locality Name (eg, city) []:San Francisco
Organization Name (eg, company) [Internet Widgits Pty Ltd]:My Company
Organizational Unit Name (eg, section) []:
Common Name (e.g. server FQDN or YOUR name) []: yourserver.yourcompany.com
Email Address []:

Please enter the following 'extra' attributes
to be sent with your certificate request
A challenge password []:
An optional company name []:
This will generate a private key that is not password protected, so it will be installable in the server as-is.
Open the directory in the Finder
open .
Submit the CSR file to your chosen Certificate Authority. They will provide a .crt certificate file. If asked what kind of server you have, just specify apache/openssl (this should get you a .crt pem format certificate).
Installing the SSL certificate
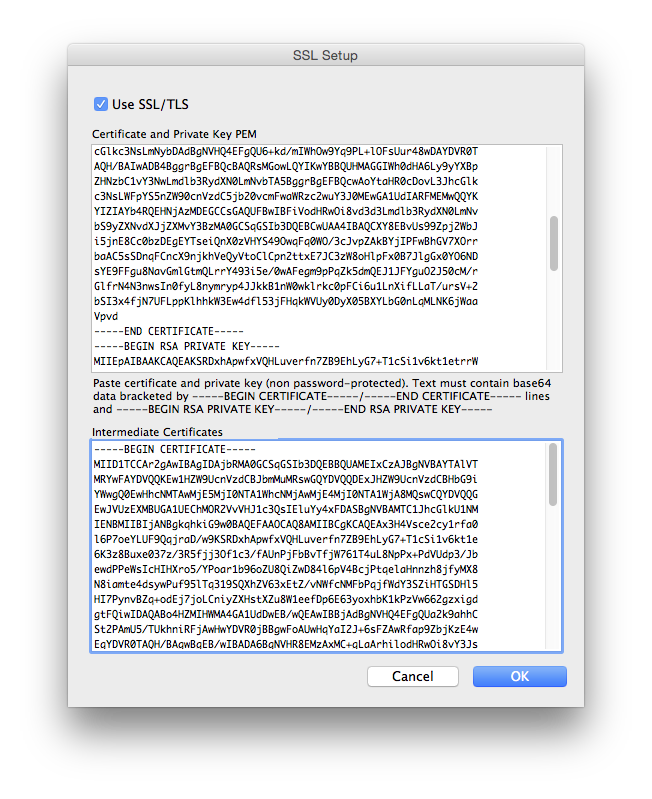
Your certificate should be in the form of a PEM text block (starts with -----BEGIN CERTIFICATE-----)
Your private key is in the form of a PEM text block (starts with -----BEGIN RSA PRIVATE KEY-----)
Open these files in a text editor and copy and paste the text into the Certificate and Private Key PEM field of the SSL settings in MoneyWorks Datacentre Console.
Certificates from many Certificate Authorities will also require one or more Intermediate Certificates to complete the Chain of Trust to a trusted root known to your operating system. These certificates will be downloadable (or copyable) from your Certificate Authority's website.
Paste the Intermediate Certificate(s) into the lower field of the SSL Settings dialog box.
Using a self-signed certificate
You can use a self-signed certificate with MoneyWorks Datacentre. This requires an extra step of setting up each client that will connect so that it will trust your self-signed certificate.
For Mac clients, add the self-signed certificate to the keychain on each client. Once imported, double-click the certificate in the Certificates list in the keychain and set the Trust settings to Always Trust.
For Windows clients, you will need to install the Certificates snap-in (Start → Run → MMC; File → Add/Remove Snap-in; Select Certificates and click Add> and Finish; Select Certificates - Current User and right-click on Trusted Root Certification Authorities → All Tasks → Import....; In the import wizard, Browse to the .crt file and complete the wizard.