MoneyWorks Manual
List Options
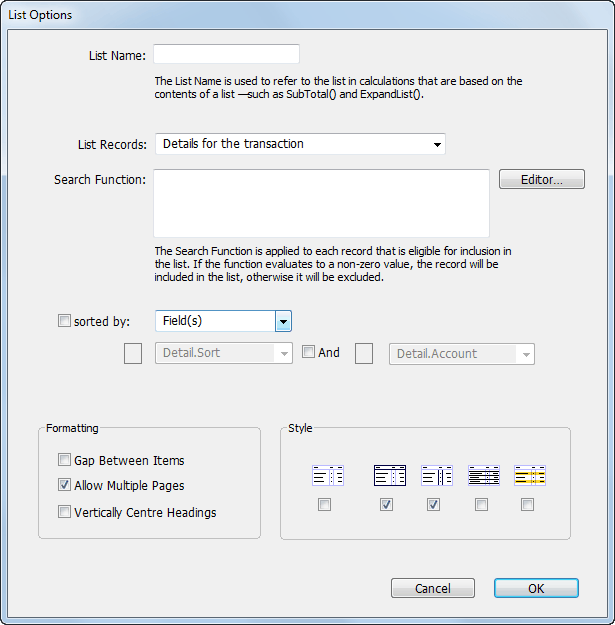
Use the List Options dialog box if you want to:
- Name the list so that its contents can be accessed from calculation boxes;
- Exclude records from appearing in the list using a search function;
- Choose a different list format;
- Change the formatting options for the list;
- List records from a different file (e.g. detail lines on a statement) or
- List data from some other source, such as a table or external database.
To open the List Options window:
- Highlight or activate the list
- Right-click on the list and choose List Options from the menu, or Choose Edit>Form>List Options, or press Shift-Ctrl-L/Option-⌘-L
- If you need to name the list, type a name into the List Name field
You must name a list if you want to extract summary information from the list using the ExpandList or the SubTotal function. The name can be up to 31 characters, cannot include any spaces, and must not begin with a digit.
- From the List Records pop-up menu, choose the source file for the records that are to appear in the list
Choosing a file different to the default makes all records from that file available. To filter them based on the context in which the form is being printed, use a Relational Search.
Calculated Row Count: Select this if you are drawing your data from a source other than a MoneyWorks list. The number of rows to output is then entered instead of a search expression.
- If you want to exclude some records from the list when it prints, enter a search formula into the Search Function box
The search function that you supply will be evaluated for each record that MoneyWorks selects for inclusion in the list. If it evaluates to False (or zero) for a record, then that record will not be printed in the list.
For example, if you want to exclude the freight item from the list in a product invoice and place it in a separate box below the list, you might use a search function such as:
Detail.StockCode <> "FREIGHT"
which specifically excludes any lines with a product named “Freight”, or:
Lookup(Detail.StockCode, "Product.Type") != "S"
which excludes any products which are “Ship Methods” from the list, or:
="[Transaction:NameCode=`" + Name.code + "`][Detail]"
would find all detail lines for the currently printing statement name. Note that in this situation the search expression will be different for each statement, and hence must be calculated each time. Thus when we are printing a statement for SMITH, we get a search expression of:
[Transaction:NameCode=`SMITH`][Detail]
Whereas for BROWN we get:
[Transaction:NameCode=`BROWN`][Detail]
Clicking the Editor button displays the formula editor window which can be used to help create the search function.
Note: If you are using your own data source and the Calculated row count option in the List Records selector, you should set the search expression to the number of rows to print. In the list itself, use the variable index to determine the row number being printed. Note that this starts at zero (so row one has index 0, row 2 has index 1 and so on).
- If you want to specify a particular order for the records to appear in the list, set the Sorted by option
Two types of sort are available.
Sorted by Fields: Select the sort fields for the list from those in the pop-up menu (these are the fields in the selected MoneyWorks list). The sort can be ascending or descending, and two levels of sort are available.
Sorted by Calculation: The calculation is evaluated for each row in the list, and the list is sorted according to the result (thus the calculation should return something different for each row). The type of sort (i.e. numeric, date or text) is determined by the type returned when the sort expression is applied to the first row—you should ensure that the calculations returns the same type for all rows (i.e. they should all return a numeric value, a date or text, but not a mixture). No sort is done if the result of the calculation is not one of these types.
- If you want to change the printing format for the list, click on the combination of icons that make up your desired list appearance:

| No box or column separation lines. Use this format if you are printing on pre-printed form stationery. The other options are turned off if this option is selected. |

| Bounding box and heading separation line. Use this to draw a frame around the list. The border colour and pen width for the list are used to draw the lines. |

| Column separators. Use this to draw a vertical line between columns in the list. The border colour and pen width for the list are used to draw the lines. |

| Record separators. Use this to draw a horizontal line between each record in the list. The colour and pen width for the list are used to draw the lines. |

| Pyjama stripes. Use this to show alternating lines of text in the list a different colour. The pyjama stripes use the fill colour and transparency, with one stripe per line of text. |
- If you want a blank line between each record, click the Gap Between Items check box
Note that the Leading setting also affects list spacing.
- If you want multiple pages to be printed when there are more records to be shown in the list than will fit on one page, set the Allow Multiple Pages check box
This option is on by default.
- If you are showing the list heading section and want your headings vertically centred, set the Vertically Centre Headings check box
This list option will centre single-line headings within the heading region of a list object, giving a much tidier layout. If you need headings to wrap over several lines, then leave this option off.
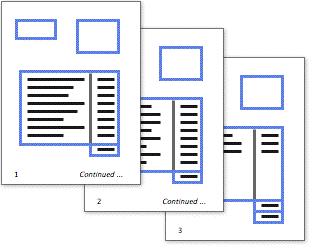
Lists and Multi-page Forms
There may be more information to be displayed in a list box than the size of the list box will allow. If the list’s Allow Multiple Pages option is set, MoneyWorks will automatically print extra pages of the form until all of the list data has been output
Normally, all non-list objects are simply repeated on the extra pages. You can, however, control the visibility of these items based on whether the page is the first one or the last one. This feature is illustrated in the example above, which has “Continued...” printed on every page other than the last one and shows subtotals on these pages. The last page has a grand total and GST total. See Page-based Visibility.
If you want a calculation to be different for each page, you need to set the Always Calculate option for the calculation, otherwise it will be calculated only once before the first page is printed.
Product Images in Lists
To insert a product image into a list (typically an invoice or quote), the calculation for the column needs to resolve to “<<prodimg:code>>”, where code is the product code of the item to print. Thus the following formula in a list column for an invoice-type form will display the item’s picture if any.
="<<prodimg:"+detail.stockcode+">>"
Note that Word Wrap for the column should be on.